When was the last time you considered your bike pedals? Unless one of them is giving you inconvenience, you’re doing a few overhauls, or you’re collecting or shipping a bicycle, it’s likely been a while. Whereas they appear basic, pedals can be exceptionally irritating to work with, since they’re joined to a portion of the bicycle that moves unreservedly: the wrench.
Furthermore, pedals tend to fix up the more you ride your bicycle, and in case they’re truly ancient or introduced without any oil, they can get exceptionally stuck. The portion of the pedal that has strings is called a shaft, and the rest of the pedal is for the most part called the body or cage.
Whereas there are numerous styles of pedals out there the foremost imperative thing to know about all of them is install and remove pedal is continuously reverse-threaded, moreover referred to as having left-hand strings. This implies simply releasing and fixing the left pedal within the inverse course merely would turn a typical jolt or screw.
The correct install and remove pedal continuously has standard, or right-hand, strings, therefore you fix or release the correct pedal ordinarily.
1. Pedal Installation
Firstly, examine the threads of the crank and pedal, and ultimately the pedals. You will start ready if the threads do not seem broken and you are aware of the appropriate spindle size 1/2′′ or 9/16′′, the right and left pedals are appropriately recognized. Give yourself a little waterproof grate.
Start threading the pedal hand in order to guarantee that the bike pedal goes straight. Please ensure that you have the right pedal left or right once again if the situation is difficult. This typically implies that the pedal and/or crank threads are ruined if the pedal can not be launched this way. Just clean the curb threads with a brush or a towel, use the pedal threads the very same way.
There's a really nice first-line defensive method if you think the cum threads are broken or worn out: drag a tiny lubricant into the threads and install the bike pedal at the back of the cum. This could only cure the threads enough to attach the pedal. This is a technique and, obviously, a special tool, called a bike pedal tap, has a legitimate manner of doing it.
The Park Tool Taps 9/16′′ will be necessary, as well as a tap handle like the park tool tap handle. I do not recommend that you acquire these instruments unless you have previous expertise and a distinctive or expensive to save. Even so, your local bike shop certainly does this better and I won't go here to take a process. The business could replace the films with an insertion if the threads aren't replaceable, but they will probably just attempt to sell you a new crank, or the left arm, if this is what the problem is.
2. Pedal Removal
I want to first show you a nice technique, which I frequently utilize when pedals are removed, especially if they really stack. Since the bike crank is moving, we want to move it so we can build a piece of cake out of the bike pedal. You'll need a strap to achieve that and any non elastic strap, whether it a buckle, a cam or a velcro kind. For this reason, Pedal Toe Clip Straps work wonderfully! No matter what strap you're wearing, just ensure you get it very terribly tight.
Regardless of the pedal you intend to remove, the alternative crank arm will be strapped into the frame of your bike. I prefer to use the chainstress (connected to the rear axle via the bottom bracket) since it is nearest to the crankstock arm and will make the considered essential:
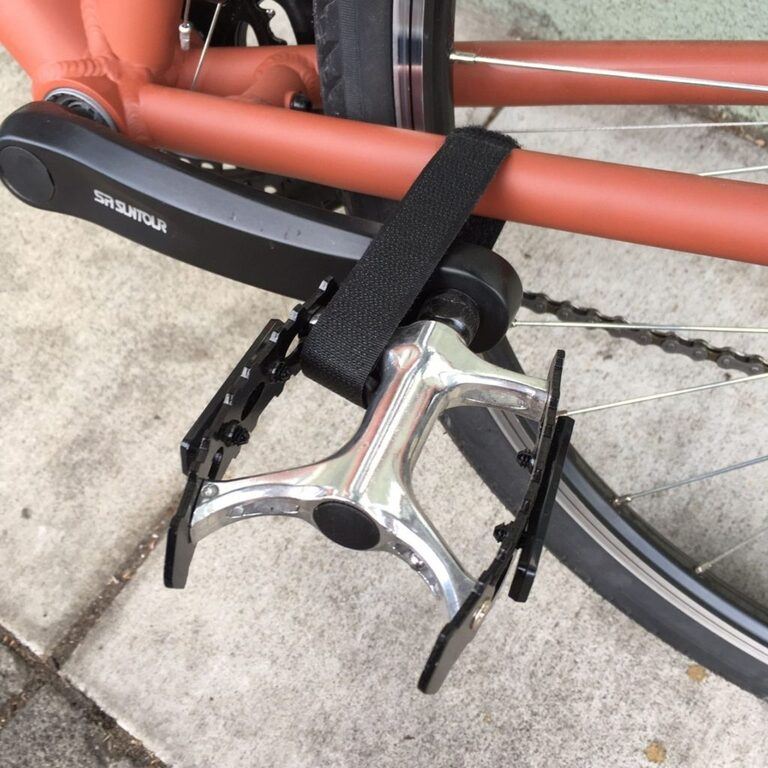
The seat tube (inserted into the seatpost) or the down tube (connections between the headset and also the bracket) works great as well. Run the strap, if feasible, as I have accomplished here, through the pedal itself and the crank arm, but don't worry if you can't do it , it still works:
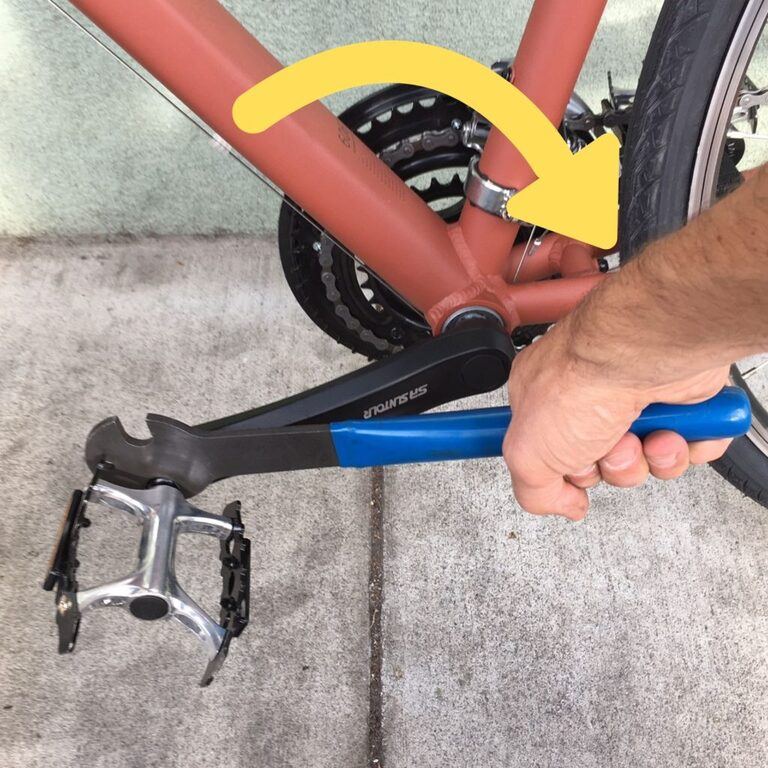
I hope you have picked the right key for this work. The following images are taken with a 15mm jaw using the Park Tool PW. Let's stop and for a second think about how to turn the bike pedal spindle so that we can extract it before we spin the wrench. Recall that the right pedal has regular threads as I said before whereas the left pedal is always back-threaded (believe me, you don't really want that!). For a visual aid, see the following illustrations:
When expelling pedals, you need to think about mechanical advantage. This can be a favored term for the intelligent utilization of your muscles, devices, and gravity in order to perform a given errand. The reason I’m pushing the torque downwards is that I’m attempting to utilize gravity as well as my body weight.
Believe me, now and then, calculating a torque of a couple of degrees will make all the difference when you’re attempting to remove a seized pedal on your grandpa’s cruiser! Or your daughter’s purple bicycle, for that matter. If you’re employing a hex torque to unscrew a bike pedal from behind, your chances of turning the torque the off-base are expanded, so allude to the photographs underneath.
After strapping the cleared-out wrench to the chainstay, I’m employing a typical 6mm hex torque, and an ancient Seatpost as an expansion to supply additional use. I’m too wearing a durable calfskin work glove, to secure my knuckles as I apply drive to the torque:
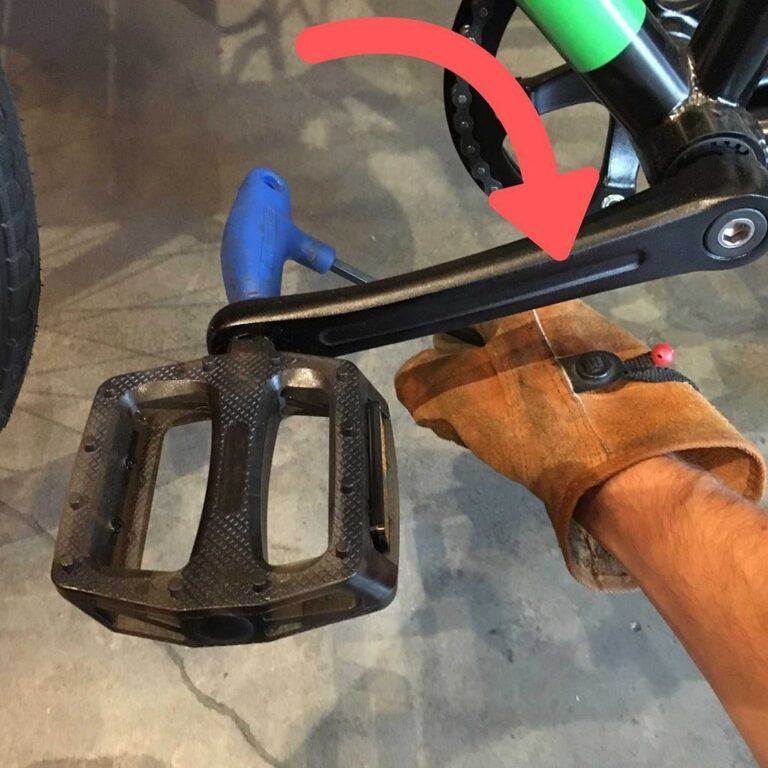
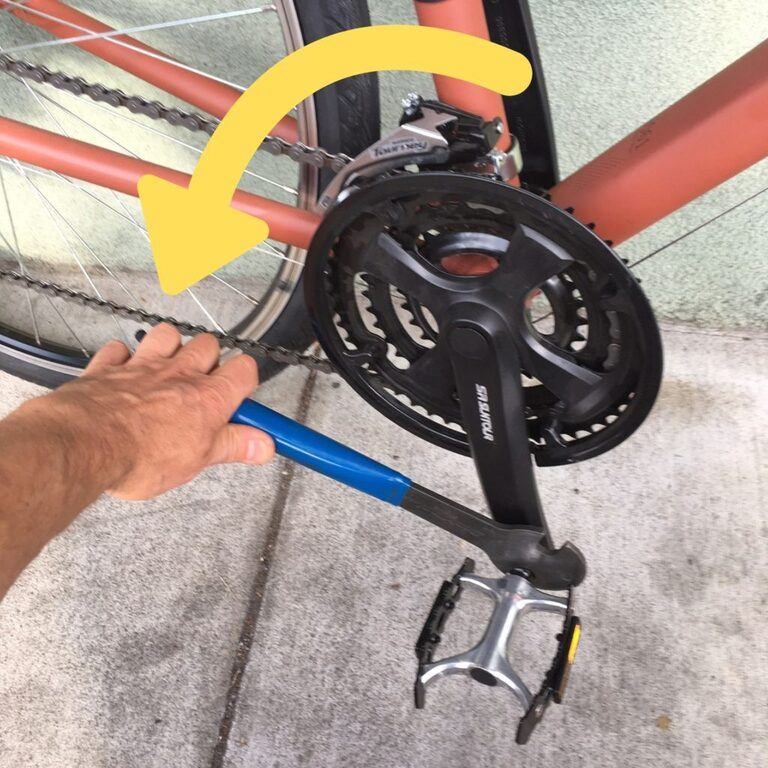
Keep in mind that indeed in spite of the fact that the hex torque is embedded from the back side of the wrench, it ought to move within the same heading relative to the wrench as a pedal torque embedded from the front of the wrench. In the event that this fair made you indeed more confused, check the photographs again. Most bike pedals will require a great starting thrust of the pedal torque to release, so don’t be perplexed to truly grant it all you’ve got! All the whereas being careful of your hands, and the bicycle.
After you’ve forced the pedal to move a bit, set the torque aside and attempt to unscrew it along with your hand. In case the going is unpleasant, by all means keep utilizing the instrument, but go moderate, particularly as you get towards the conclusion of the strings. To wrap up, fix the last few strings by hand, as this will minimize potential harm to the external wrench strings, and anticipate dropping of the pedal. On the off chance that typically you begin with bike pedal evacuation, deliver yourself a pat on the back!
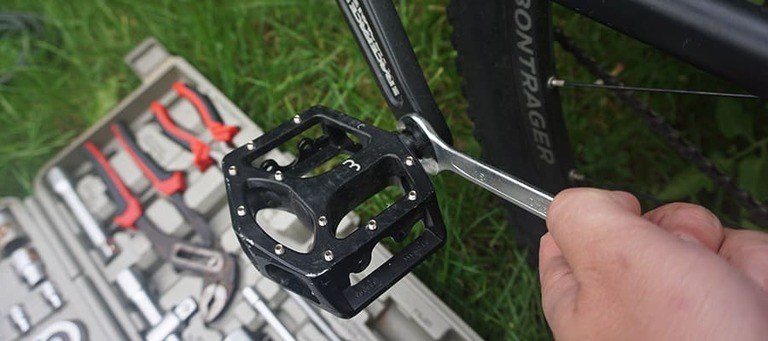
3. Necessary Tools and Supplies
The larger part of pedals can be introduced and expelled in a squeeze with a standard 15mm open-box torque in your carport, or indeed an movable (bow) torque, but I don’t prescribe these for two reasons. One, the handle is ordinarily as well brief to supply sufficient use to expel a pedal, and two, it’s more likely to scratch the crank arm.
On the off chance that you arrange on working with bicycles a reasonable sum, a dedicated pedal torque could be a beneficial buy. A fundamental one just like the Stop Instrument PW-5 costs less than $10, and includes a pleasant, long vinyl-coated handle. All appropriate bicycle pedal torques will comprise one or two 15mm jaws – smaller than a customary torque to fit into the tight space between the wrench and pedal body – and a considerable handle for great grasp and use.
Stop Tool’s higher-conclusion models, the PW-3 and PW-4 are longer, heavier, and tougher, and well worth the cash in the event that you work on bicycles a reasonable sum. There's moreover a pedal torque made fair for single-speed and fixed-gear cyclists, the Park Device SS.
Note almost all pedal washers: these are essentially washers that are mounted between the pedal axle and the wrench, and they are for the most part not vital unless you're dealing with an extremely costly aluminum or carbon wrench. In the event that you evacuate a pedal and the washer is there, you likely ought to utilize it once more after you reinstall a pedal into that wrench. Something else, you'll seek for the show of your crankset to discover the specialized report, and this ought to tell you on the off chance that you ought to utilize washers.
Conclusion
There are many reasons to exchange your bike pedals, correct damage or upgrade to finer. Or you could wish to move from apartments to clipless or back to apartments. Anyway, follow gearinstant guideline you may now remove and install bicycle pedals without damaging them.


