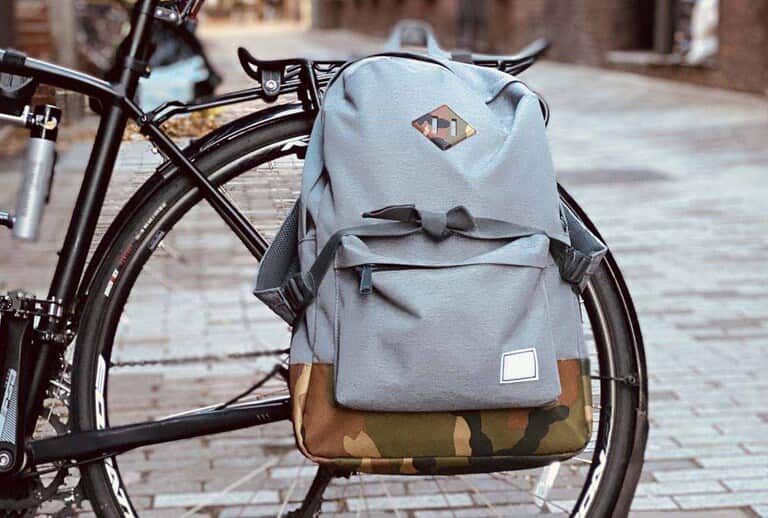
When traveling by bicycle, it's convenient to be able to store your belongings on your bike instead of on your back. There are costly bags available that are specifically designed for this purpose, but you may also make your own!
Either you create something that attaches to your rack, or you don't. You might, for example, have a design that makes it simple to attach your bag or anything else you're transporting.
As an alternative to purchasing new bags, you may repurpose old ones by adding a few hooks so they can be used as storage on your pannier rack.
To avoid becoming caught in your wheel's spokes, make sure the object you plan to carry has a solid back. You only need to attach two hooks to the top, hang it on your rack, and keep in mind it's also attached at the bottom so it doesn't fall out.
You can also create your own bag from a piece of (roughly waterproof) cloth. The same applies here, ensure that the backside is sturdy and that there is a means to attach it.
What You Need To Make Pannier Rack
1 metre of 44/45 "cotton oilcloth, vinyl, or a comparable laminated fabric
1 thread spool in the matching color
3 1/3 yards of 1" to 1 1/2" webbing
13 of a yard "-Velcro with a wider face or sew-on Velcro
4 buckles of sufficient width for webbing
What You Have To Do
Front (cut into half)
Back (cut into half)
Flap (cut into half)
Side (cut into four )
Bottom/handle
4" 8" (cut into three )
Step 1 : Make a layout
Lay your cloth out in a single layer, right side up. To cut numerous pieces of cloth from each pattern, you may wish to make duplicates or trace around them. Cut out the designs once they have been placed on the cloth in accordance with the arrangement. Reverse the cloth and transfer the pattern piece marks to the reverse side of the fabric. Measure and make a mark on the bottom/handle piece.
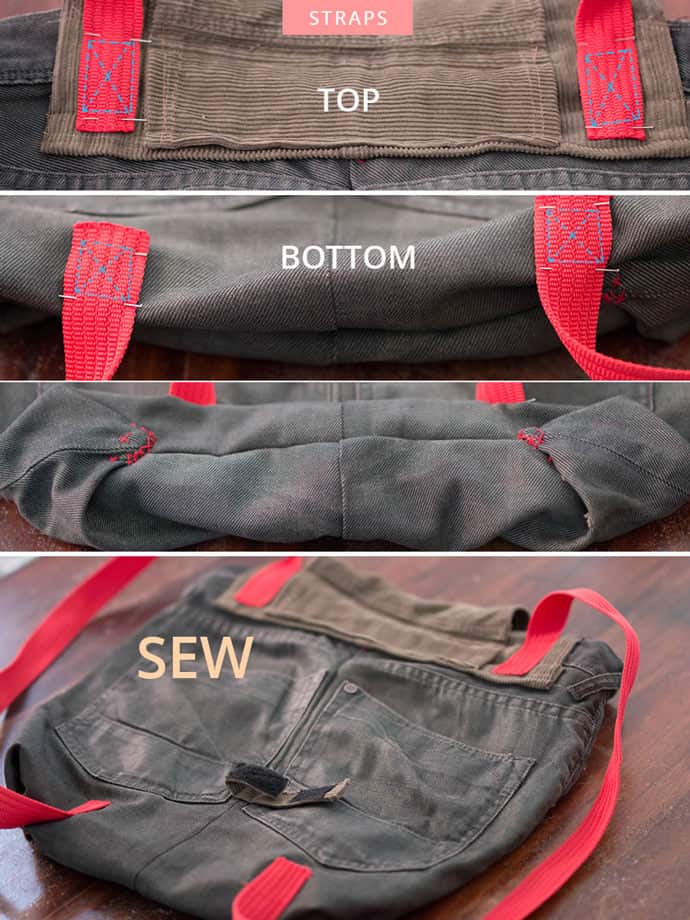
Step 2 : Putting the webbing and buckles together to the front
The webbing should be cut into four equal sections, each measuring 4 inches wide. Using a parachute buckle's female side as a guide, thread one piece through and fold it in half so the ends are aligned. Stitch the ends of the cord together using basting fluid. Continue with the rest of the webbing and parachute buckles if necessary.
To align the raw edges, attach two webbing/buckle pieces to the lower raw edge of each of the front sections. Tie the webbing ends together with an edge-stitch.
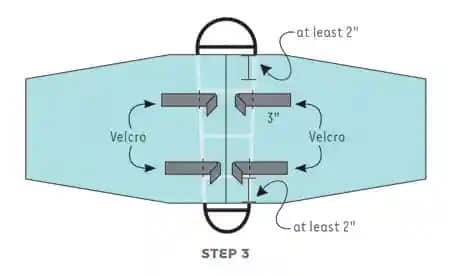
Step 3 : Assemble the back
Stitch across the widest part of the top of the back panels, right sides together, with pins.
Four double-faced Velcro straps can fasten the pannier to the bike. In order to make the straps more comfortable to wear on your bike, place them right-side up on your rear carrier rack, with their seam in the middle of your carrier rack. Look for the pannier rack under the cloth at least two inches from the raw edge on each side and indicate where the center of the four ropes should be inserted. (The loops on this piece will eventually roll around the rack's side poles when it is facing down.)
Using regular stitch Velcro, place the hook and loop pieces right sides together (hooks slightly away from each other) and stitch along the long edges to make double-sided Velcro.
Using the Velcro, create four 6" sections "pieces and draw a line down the middle of each one.
Leave three stitches between the Velcro pieces and the stitching markings when you center them on the placement marks "Straps on each side of the centerline are left free so they can be buckled around the pannier rack.
Step 4 : Make the handle
Fold the short ends 1/2"to the incorrect side and press the button. By pressing the handle in half lengthwise, with the incorrect sides facing up, you may make it smaller. Fold the paper, then use a hot, dry press to smooth down the rough edges "up and over the fold instead of down and out. Fold the handle in half length, press it, then edgestitch it all the way around.
Step 5: Stitching the flaps
Stitch across the broad top border of the flap pieces once they have been pinned with the right sides together. Open the seam allowance with a press. Fold and flatten the raw edges of all the stitched flaps by 1/2 inch to the wrong side. Stitch the flaps with a topstitch.
Note : If the fabric is relatively thin, you will need to use a 1/2 " double-fold hem instead of the stated 1/2" single-fold hem.
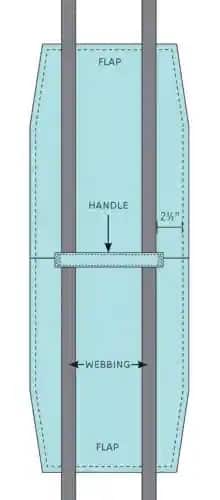
Step 6 : Putting the webbing and buckles together to the flaps
Cut the leftover webbing into two 1 1/2-yard lengths and put a line along the middle of each one. The indicated (centre) lines on the webbing should be directly above the seam and 2 1/2" from each finished edge when attaching the webbing to the flaps. To attach the flaps to the webbing, sew along the center lines that have been drawn.
Center the handle, slightly to the right, over the flap seam's right side; the handle should reach 1/2" further than the webbing pieces. Stitch the handle into the flaps along the edges. Make another stitch along the first one for extra stability.
Step 7 : Gathering the panniers
Fasten two sides to each front with the correct sides together, halting 1/2" from each beat and foot corner.
Fasten one bottom to each front with the proper sides together, starting and ceasing 1/2" from each bottom corner.
Fasten the sides to each foot with the proper sides together, halting 1/2" from each foot corner.
Fasten one back to each foot with the correct sides together, beginning and ceasing 1/2" from each foot corner.
Stitch the backs to the sides together, starting and ending 1/2 inch from each side corner.
Turn the pannier rack set on its side and remove the items.
Make a 1/2-inch or 1/4-inch fold on each raw edge and push to the opposite end. Stitch the hem up with a topstitch.
Step 8 : Attach the flaps to the panniers
With the wrong sides of the flap and the sides of the pannier aligned, attach it to the bag using pins. Make a running stitch along the flap's side edges to attach it to the back, stopping short of the pannier bag's holes.
Measure and mark stitch lines along each flap 3 1/2" from the center seam, holding the webbing and Velcro out of the method to avoid snagging. Make that the specified lines are below the Velcro (on the back) above the pannier rack bodies. Topstitch the flaps to the back, following the lines you drew.
Step 9 : Complete
Run the webbing down each fold and fasten it in put at the foot (hemmed) edge, 1 1/2" from each side.
When attaching the flap to the pannier, make sure the center seam and side borders are aligned before pinning with the wrong sides together. Stitch the flap to the back along the side edges, stopping just short of the holes for the pannier bags.
Aim for a line that is just above and below your panniers' Velcro straps (if you have them on the rear). Topstitch the flaps to the back along the drawn lines.
Put the flap webbing through the male side of the parachute buckle and cut it to the appropriate length, making careful to leave it sufficient to allow a fully packed pannier rack. Using a double-fold hem, finish the webbing's rough edges.
Conclusion
Cycling is a rewarding and pleasurable pastime. However, completing the functionality of your bike is preferable. Aside from riding your bike for commuting, consider installing a rear bike rack to make it more versatile.
When it comes to adding convenience to your bike, nothing beats a rear bike rack. It's a fantastic addition for any type of rider, no matter what their demands may be. Please ensure that the bike rack you choose will meet all of your requirements and budget before making a parrier rack.
We hope this advice on how to utilize a rear bike rack will be beneficial to you. We made sure they had all the information they needed, from where to look for the correct item to how to install it. If you have any further questions or concerns, please feel free to express them in the comments section below so we can assist you.


