So you decide to upgrade your dependable but old vehicle with a backup camera. great concept These practical devices have had such a positive influence on the car sector that they are now required as essential safety features. But there are other ways to obtain backup cameras besides dealership trips.
Back up cameras are now easily installed on older vehicles by anybody using aftermarket parts that are freely accessible. A backup camera is completely incorporated into the electronics of modern cars, hiding the system's parts. Installing a bespoke aftermarket system also has that as its purpose.
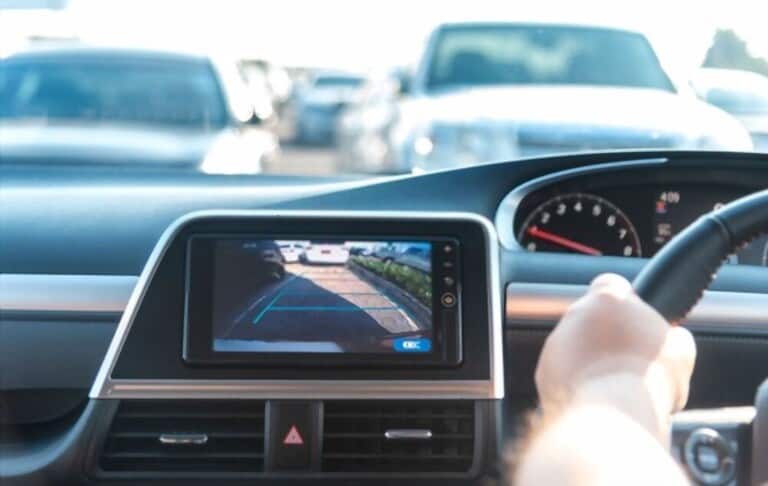
You won't ever need to crane your neck backward to see whether young Timmy is performing Big Wheel donuts at the end of the driveway with a few adjustments to the car's rear and a few wiring connections. The steps on how to install a backup camera in the car are here to guide you through the procedure.
How to Install Backup Camera in Car
Driving has become more convenient as a result of significant advancements in automobile technology. Modern cars come with a ton of features, like rearview cameras, even when they are capable of autonomous driving. But what if you didn't receive one with your car or your budget doesn't allow for a new one? Fortunately, it's far simpler and less expensive than you may imagine some steps on how to install a backup camera in a car.
Selecting Your Gear
Selecting your gear is the first step on how to install a backup camera in a car you have to know. Finding the proper equipment may be challenging due to the abundance of gadgets available online and the wide range of prices. The most popular methods for mounting rear view cameras are using the provided bracket or using your license plate. The film is frequently shown on your aftermarket head unit or another screen added to another location. In the latter case, kits will come with an additional monitor or a screen for your factory mirror. This article will explain how to install a product despite the wide variety available on the market.

Equipment You Will Need
Before you learn how to install a backup camera in a car, you should know the list of equipment you need. Like with most installs, you must collect the components and tools you'll need. The bulk of these tools are undoubtedly already in your home, but here are the ones you'll need to finish the task safely.
- Safety Equipment gloves and eyeglasses
- Wire cutters
- Cutters for wire
- Electrical tape trim removal tool and multimeter
- Drill for soldering iron and many parts
- Alternative electrical connections, such as posi-tap
- Socket Set with Cable Ties
- System for Rear View Cameras
Poor performance is prevented through careful planning
Disconnect the ground line from the battery and make sure the car is not powered up before performing any maintenance on it. Failure to do so might result in significant injuries or electrical blackouts. Wear the appropriate safety equipment; the last thing you want to do is endanger yourself or the new equipment you have purchased.
Installing Hardware
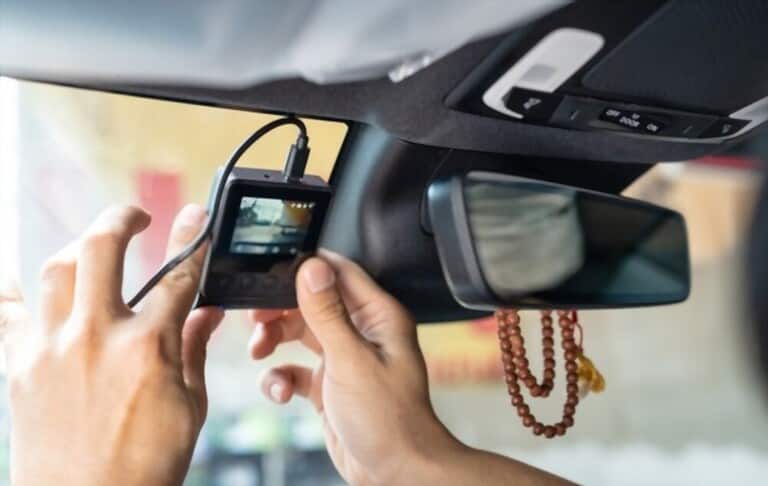
Installing hardware is also one of the important steps on how to install a backup camera in a car. You must get access to the area where the equipment is mounted. This will frequently be easy because it might be the dashboard or the rearview mirror. Only if you already have an aftermarket head unit that supports the feature will you not need to attach additional equipment. After that, you would need to gain access to the head unit's back.

We'll be utilizing a rear view mount mechanism in this situation. Wrap your new rearview mirror around the one that already exists in your car using the elastic straps that are included. Make that the mirror is clear and continues to operate properly.
The camera must then be mounted to the vehicle. The simplest method is to use a license plate bracket, which only requires two screws. Mount it beside the trunk handle if you want to keep the OEM look as much as possible for aesthetic reasons. Either drill holes into the trunk or use double-sided tape to do this.
Make sure all mating surfaces are clean before applying double-sided tape since any dirt might cause the camera to come loose while you're driving. You may clean mating surfaces with any cloth and isopropyl alcohol.
The camera line needs to be run within the trunk, which requires drilling. If you want to maintain a clean appearance, this step will be the same for whatever kind of camera mount. You only need to make sure that nothing may be harmed during this stage, which can be challenging. Drilling can begin as long as there are no cables in the path.
The wiring is finished
To supply power to the rearview camera, you must find the fuse panel or a switched power connector. All automobiles have fuse boxes, but some have posts specifically for this, which is really useful. Since you presumably want to start your automobile the next morning, this step is crucial. The rearview camera device may continually drain your battery overnight if used incorrectly.
Fuses are excellent sources to piggyback off of since they only receive electricity when the key is turned "on," like your wipers or radio. Using a multimeter to determine which fuse terminals receive power when the key is turned "on" is an excellent technique to test this.
You must take a fuse tap and insert it into one of the pins of the terminal as indicated in the figure once you have determined which fuse has switched power. To retain a neat appearance, tuck the wires into the required trim as before.
The rearview camera has to be aware of when the vehicle is in reverse and in need of a video signal in order to function. Running the provided cable from the front to the rear of the vehicle does this.
The rearview camera has to be signaled next. You may accomplish this by using your reverse lights. The wires that lead to your reverse light may easily be found by disassembling your tail light assembly. Ask a companion to depress the brakes for you. It will be simpler to determine which wire to tap into because this will power the brake light.
Check which wire is receiving 12 volts using your multimeter. The new signal wire has to be connected to what is currently installed on the automobile. The simplest technique is to tap the new wire into the existing one using a Posi-tap or other electrical connector. Use a twist connection in this situation to make the operation simpler. A different approach is to physically remove the wire and solder the replacement in.
The rearview camera system should be completely functional after finishing this step. By attaching the ground line to the battery post and providing electricity to it, you may verify your work. Then, shift into reverse and check the camera's functionality. You're prepared to put the automobile back together and make it seem tidy again if you can see behind your car.
If it still doesn't work, double-check your work to make sure all the wires are connected properly. Before the cables are hidden beneath trim, the problem may be fixed much more easily. Assure them that the extra cable won't cause any interference.
Conclusion
After making sure the new system functions, you may put the automobile back together to restore its former appearance. It's time to put back some of the trim pieces you removed. They usually install without a hitch, but because there is another cable going underneath, they can be annoying. Use zip ties to secure the new wires in place and tuck them behind the inside-running existing wires. You may start driving right away when the trim has been replaced! Hope above information on steps on how to install a backup camera in the car will help you.


