Good old fingers, yeah, good old fingers. Any beginner learns the fingers are vital right away, while certain portions of the corpse need to be noted as important - no sensation of damaging the fingers and torn skin from a long escalation after a split. Since fingers are so vital, how do you grab your fingers and how do you do it appropriately? Two key explanations are given for tape: Firstly, skin protection, secondly, tendon and squirrel protection, and even structural integrity. Many beginners instinctively feel while skin coverage is something, pulley and joint protection will become necessary after climbing for a while.
Wrapping your finger pulleys
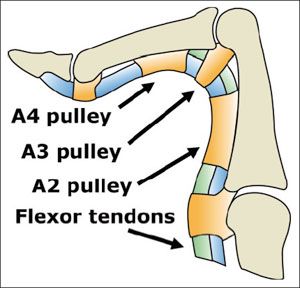
The tiniest pieces on your hands are the finger pulleys — small tendons in your finger working on preventing sheathen fall and expansion in motion. Improper treatment is one of the principal causes of injuries, so it is necessary to tape them in the correct direction.
Begin your tape—use just one strand—around the first phalanx in your hand and cover four, maybe six times. First phalanx would be the one between the first and second plume with your fist. The tape is close but relaxed. You’ll like it. Cross the band across the joint and cover it four times all around the second phalanx.
Ring Method
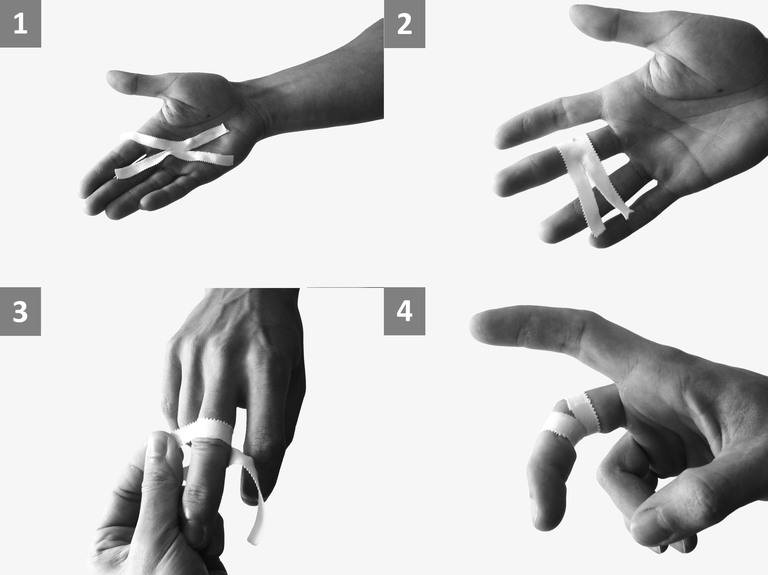
Only take a climbing tape for this technique and don't panic – it's the fastest way to tap. The two main pulleys, normally wounded, are protected. Place the tape as a ring in the photo over the finger. We use the center finger in the picture since this is one of the digits that is normally hurt. Keep the finger bent gently as the tape is applied.
Then tighten up the band, while you start wrapping like a casual ring around your finger. Take the tape way up the finger until you have overlaps as you gently bend the finger. Only don't pull the band too close, so you don't want to stop fingering or blood flow.
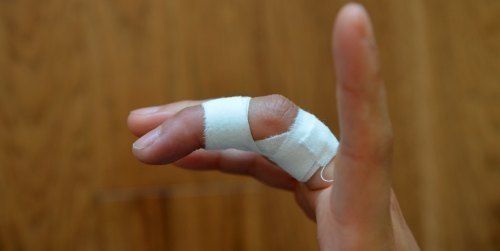
X Method

This procedure tapes both the front and back pulleys of a joint. The hypothesis is that if one squirrel is hurt and the other is injured, it's possible that both sides will suffer damages and be harmed. You are going to use one sheet of tape to tape the two sweaters. Remove the first pulley from the joint, drag and then loop it around in a complete pass and cross the joint again before the other area behind the joint is reached. Now wrap the whole pass, cross back to where you come from.
Now it seems like an X, so the tape passes in the center of the joint. Repeat it from two to three times . You have the whole spectrum of movements, this doesn't limit, and you have both poultry protected, so you can help while crimping or flexing.
H Method
The H method is the latest, and the shuffle method is often named since the first description in Journal of Hand-Biomechanics in 2007. Particularly a changed X method, as both sweaters are supposed to be wretched when one begins to hurt.
Have a piece of tape and split it in the center so that it's got two small legs like in the picture. In fact it's a big tape bit, you cut the center on either side, somehow. Wrap it around your finger and place the center of the H over the joint, because if you've a broader cord, it works even easier. First, use the front pulley and get around the top of this little knee. You can only push it on its side if it gets in the way, then just go around the finger's tip. Squeeze it down and make it safe. Then use the second leg only to end this pulley with half a step.
Start running around your finger again on the back pulley, shift the tape to the side and lock it. Then take the other piece of tape in the same way. Go around, because there is always a whole variety here, so the finger's knuckle doesn't get taped. But if you crimp or stretch your finger, you can see that you have a lot of protection on your poultry and finger back. If you crack or bend your finger, you really can feel the tape supporting you, all sweats are protected now and again.
Recovery Tape
You must efficiently keep the A2 and A3 ring poultry from breaking and ripping once you have hit the point of no return and have already ripped your finger joint. You can also crawl, so it is not possible to crimp. Concentrate on your talents open to your fingers, before they heal.
Tap your finger halfway up the first phalanx to keep the pulles from being destroyed imminently. Only take a few laps before you're halfway between the second and third articulation. your finger is hidden. You're supposed to have at least 50% overlapped per round of tape. The goal here is to avoid breaking your wrist.
Protecting Your Wrist
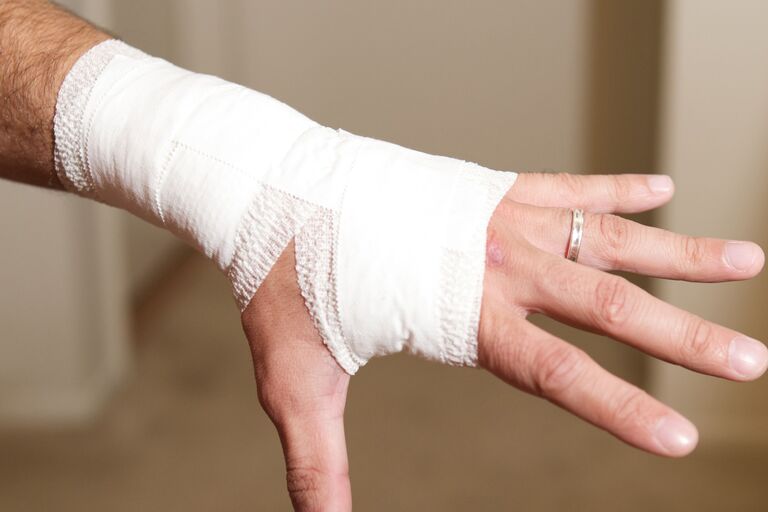
If someone told you that by taping you would avoid wrist fractures, they lied to you. But if you've succeeded in twisting it in a strange way when you ascend, there are ways to grab it for recovery.
The dorsal cross is one of the most efficient processes. Start with placing a strip of strip across your palm and walking over your thumb to cover your hand several times. Put a strip of tape right under your wrist and put it up and down to protect your handle.
Start a third strip on the right side of the band that you originally began under your handle on the back of the hand with your wrist curved a little sideways. Take the tape again and again your thumb's back, and put it back down into a circle over your palm. Repeat this step on the other side and shape a cross over the back of your hand to handle efficiently.
Try rolling up your wrist another sheet of cassette to help hold the remainder of the cassette in place.
Note that the idea of tape to help avoid injuries while climbing is supported by no definitive medical data. Nevertheless, it will help relieve the discomfort from your still injured hands and save you from being squeezed gnarly.
Conclusion
Wow, in one post a lot of detail. Pickups: Taping is ideal for protection, but don't overdo it when you break, for the fingers and for the entire hand. Taping is also good for avoiding damage to the finger joint, using either of the three techniques I have discussed. If you want a decent tape and bear in mind that careful escalation reduces the chance of damage and skin complications, buy high standard tape. To learn the right technique for squeezing!


