This is a crack climbing on the first day. You are struck by the sun. It's sunny in Montana in September; the wind is poisoning. You know that the cracks of sharp granite all over here cause you bleed your hands — you realize that you need a nice goddamn tape glove.
Ignore the decades of careful study behind taping techniques, you mummify your hands carelessly with one-inch sports tape. You’re jamming a wide (a crack of irregular diameter, normally between finger and hand) after giving up your belayer. 12 vertical feet thereafter, the tape gloved is broken and breezes, and the blood spills out from your beef mitts must be evaded by your comrade below.
1. The Most Basic Tape Gloves
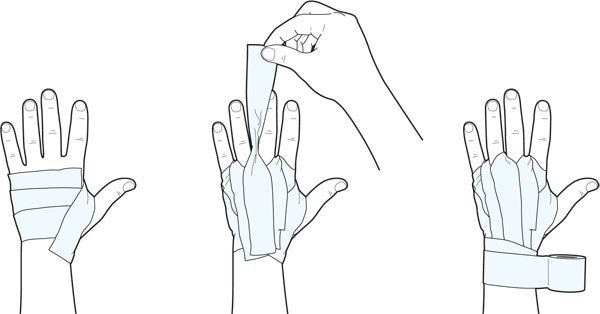
These gloves are the starting gloves if you haven't ever taped. They're very difficult to do first, but you can re-use them for a whole season until you learn them. You will also have outstanding absolute coverage on your side.
Step 1: Remove from index knuckle to rose knuckle five strips of strips tape as big as your hand and put them on your hand back. Through your knuckles to your thumb, you can protect the back of your palm.
Step 2: Remove four band strips about 12 cm long. If you have little hands, and bigger if you have big hands, they would be shorter. In any case, making them too long is easier than too short. You will shorten your tape any time, but you cannot extend it
Step 3: Wrap similar 12-inch sheets of tape around between the point and the center finger to touch the wrist again. Do the same wrap on each of your fingers from the elbow, through your fingers and back to your wrist. Make sure you don't have folds and the tape lays on your palm as smooth as possible.
Step 4: Once your hand's back is hidden fully, take a final piece of cord around your thumb.
NOTE: It's critical that this strip isn't made too close. If you do, the circulation will be closed off and hyper pumped when you are ascending.
Step 5: Flex to see how they look! Flex your hands. Ensure that they're not so tight and don't have many folds . Start again, if they do!
2. Finer Loop Method
This technique is excellent for crack climbing all day long. The palm of your hand will not be covered, it is comparatively easy and can also be used (with skilful application).
Step 1: Ripped 5 complete tape strips, 7-8 inches in length each (base on the size of your hand).
Step 2: Begin each stripe on your wrist outside, one centimeter under the bone. Lay any digit up around and combine them together, even outside of your pinky thumb and thumb.
Step 3: Put the gloves on the base of the wrist 2-3 times.
Step 4: All you should do is replace the wrapping strip any time, if you wish to reused your glove.
3. X Method
On single pitches or short days, you can use this approach. The good thing: it uses as little film, and it's quick. The poor thing: your entire side, including your thumb, is sealed, something that some people feel uneasy or constricting. Furthermore, the knuckles are not as secure, because the tape will break up and roll. How to do it here:
Step 1: You'll tie a single strip over your hand rather than cutting strips.
Step 2: Wrapping the handle once, then across the palm horizontally, and then across the palm directly. You should try making an X with the tape, which is why the label.
Step 3: Make two layers or more. Be cautious not to wrap too closely or blood flow in your hands will be limited.
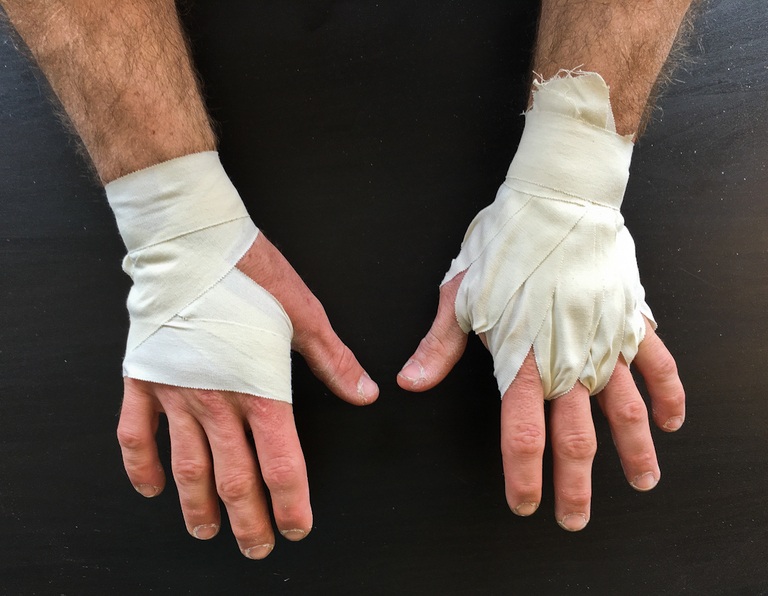
4. Offwidth Gloves

For offwidth, there are several common methods of tapping. It varies according to rock form and the offwidth form. Some people always make fresh offwidth band gloves, and some people repeatedly reuse them. I'd rather use the reusable gloves individually so I'll show you the plain tape gloves.
Step 1: Lay a band against your hand's back above your thumb's knuckle bone. Wrap the piece around the muscle of the thumb and around the gap between both the thumb and the finger, until a complete bow around your thumb has been formed.
Step 2: Take another band and tie it comfortably around your thumb over your previous band. Do this again for a third and last tape bit. At this phase, your thumb should be covered entirely in tape. Like a little mother! A little mother!
Step 3: Now, much like regular recycled gloves, make tape gloves.
5. Hybrid Method
The way it sounds is as plain. Combine the X approaches with the finger loop. You're a true celebrity trading now.
6. Super Thin Method
Perhaps you want to use this technique if you want to cover your flips or hands in an already quite crack. It just needs a couple of sticky sprays and a few thin bandes!
Step 1: Mueller Pre-Tape Spray, sprinkle the back of your palms.
Step 2: Use the hand's two or three strips of tapes
7. Purchase The Right Tape
Any seasoned business climber tells you—the higher the sticker of the tape. You have a big difference in the consistency of your tape, so make a great decision!
Making a right glove is more critical than it might look like to use the right tape, so don't skimp! No matter how your hands are wrapped up carelessly – your job is not going to last long.
If you have the most upright method of tape glove, let us know down below !
Conclusion
It should not be too tough to choose the right tape climbing gloves. Buy a climbing tape and glove that better fits your climbing targets, if you're not positive. For each kind, from thin finger jams to burlies off the widths, you are capable of finding different use. You could still check out the budget alternative if you don't want to spend lots of money : no protection! The genuinely original way to break up, repetitively create these callous and a tape climbing glove is integrated!


